A commercial acrylic mirror wall should be installed as a coordinated system: prepared substrate, approved adhesive, controlled module alignment, natural seams and protected reflective faces.
Installing acrylic mirror wall panels is a system decision, not a final decorating step. A flat and stable base, a compatible adhesive, planned natural seams and disciplined surface protection must work together. If one part is wrong, the finished wall can show waves, bubbles, lifted edges or permanent scratches even when the panels were manufactured correctly.
This guide explains how to install acrylic mirror wall panels for commercial interior projects from a supplier and technical-support perspective. It is intended for fit-out contractors, installation teams, distributors and project buyers. Final fixing details must always follow the technical data for the exact mirror grade, backing construction, adhesive and site condition.
The Four Conditions That Decide Installation Success
From customer questions and post-installation feedback, most problems can be traced to four decisions:
- Substrate: Is the wall or backing rigid, flat, clean, dry and capable of holding the selected fixing system?
- Adhesive: Has the adhesive been confirmed as compatible with the mirror backing and the substrate?
- Natural seams: Does the layout allow panels and profiles to accommodate manufacturing and in-service movement?
- Protection: Will the face film stay in place until cutting, fitting, trimming and adjacent work are complete?
These decisions should be approved during the mock-up stage. Solving them after a full wall has been bonded is expensive because a damaged reflective backing or scratched face normally cannot be repaired invisibly.
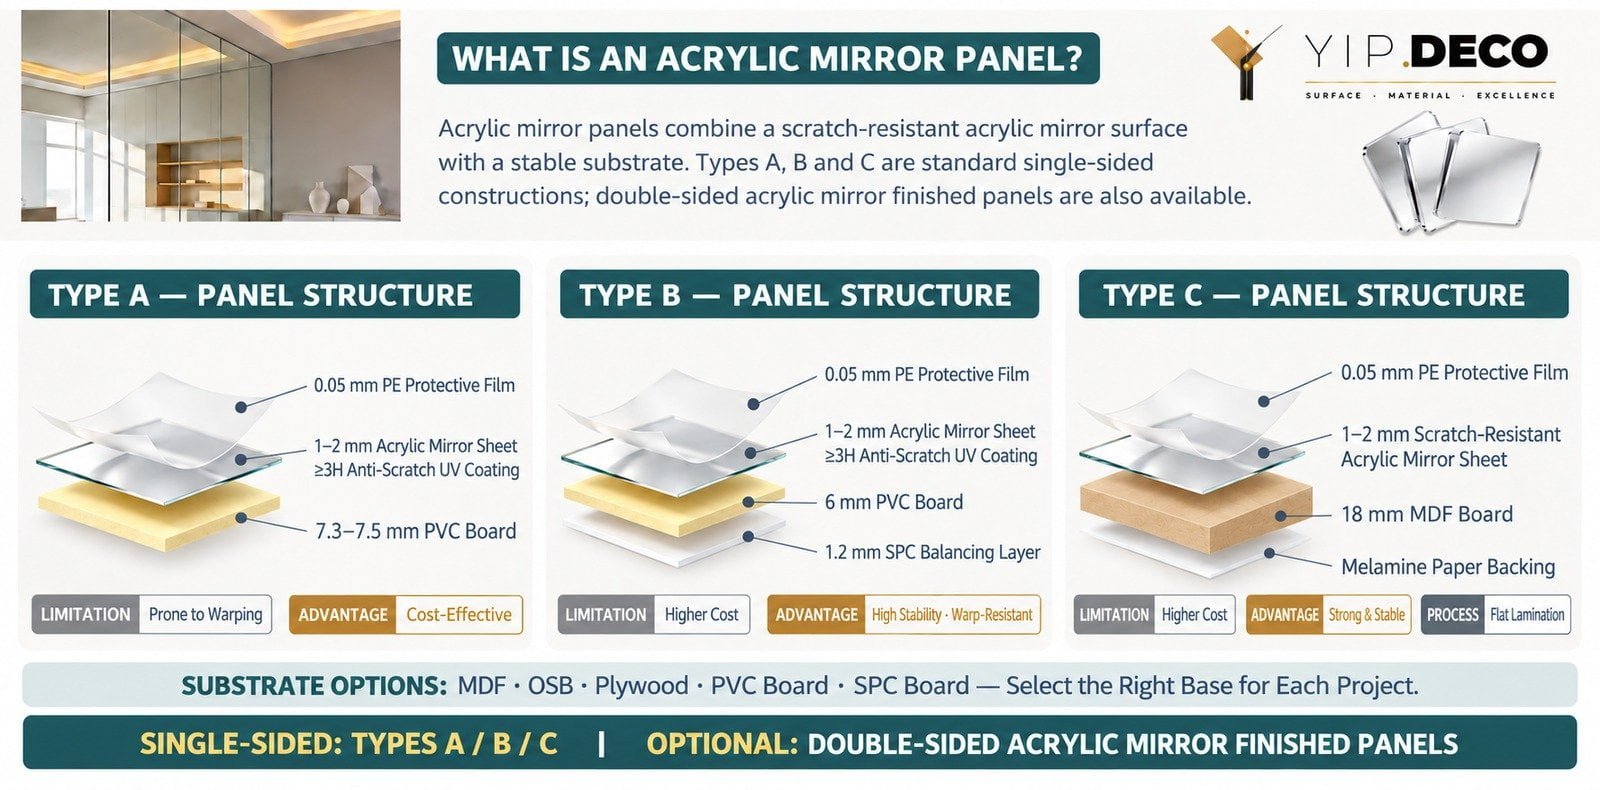
YipDeco finished-panel options combine an acrylic mirror face with different supporting constructions. Type A uses a PVC board, Type B adds an SPC balancing layer, and Type C uses an MDF base with a backing layer. The correct installation method depends on the complete construction, not the mirror face alone.
Start by Confirming the Product Construction
“Acrylic mirror panel” can describe a flexible mirror sheet or a finished panel laminated to a rigid substrate. The distinction affects handling, flatness, adhesive selection, edge finishing and fixing.
A loose mirror sheet follows the condition of the surface behind it. Small hollows, ridges or uneven adhesive beads can become visible as reflection distortion. A finished panel has a more controlled backing, but the installer still needs to confirm its thickness, weight, edge detail and connection profile.
Before installation, record:
- mirror face material and thickness;
- protective film type and which side it covers;
- reflective backing or coating construction;
- rigid substrate type and total finished thickness;
- panel dimensions and grain or tint direction, if relevant;
- approved adhesive chemistry;
- edge, corner and joint profiles;
- orientation: vertical wall, feature element or overhead application;
- any requirement for mechanical retention.
Do not use the method for a plain wall panel automatically. Mirror backing can react differently to solvents, and the reflection makes local pressure and unevenness much easier to see.
Which Substrates Are Suitable for Acrylic Mirror Wall Panels?
The substrate is a pass-or-fail condition. It must support the bond without moving, shedding dust or transferring visible irregularities through the mirror face.
| Substrate | Project assessment | What to confirm before bonding |
|---|---|---|
| Finished MDF, plywood or rigid board | Often suitable for controlled interior panel fabrication | Flatness, moisture condition, face coating, edge sealing and adhesive compatibility |
| Prepared drywall or cement board | Conditionally suitable for wall installation | Board fixing, joint treatment, primer, surface strength and allowable load |
| Concrete or masonry | Conditionally suitable after preparation | Cure condition, moisture, alkalinity, laitance, dust, flatness and suitable primer |
| Existing tile | Higher-risk retrofit condition | Bond strength of old tiles, loose areas, grout-line telegraphing, degreasing and primer |
| Painted wall | Depends on the paint system | Paint adhesion, chalking, contamination and compatibility with the adhesive |
| Flexible, damp or friable surface | Unsuitable until corrected | Replace, reinforce, dry or prepare the base before installation |
Avoid reducing the check to “clean and dry.” The installer should use the moisture-testing method and acceptance limits specified for the substrate and adhesive system. Concrete cure time, board moisture and ambient humidity cannot be reduced to one universal number for every market and project.
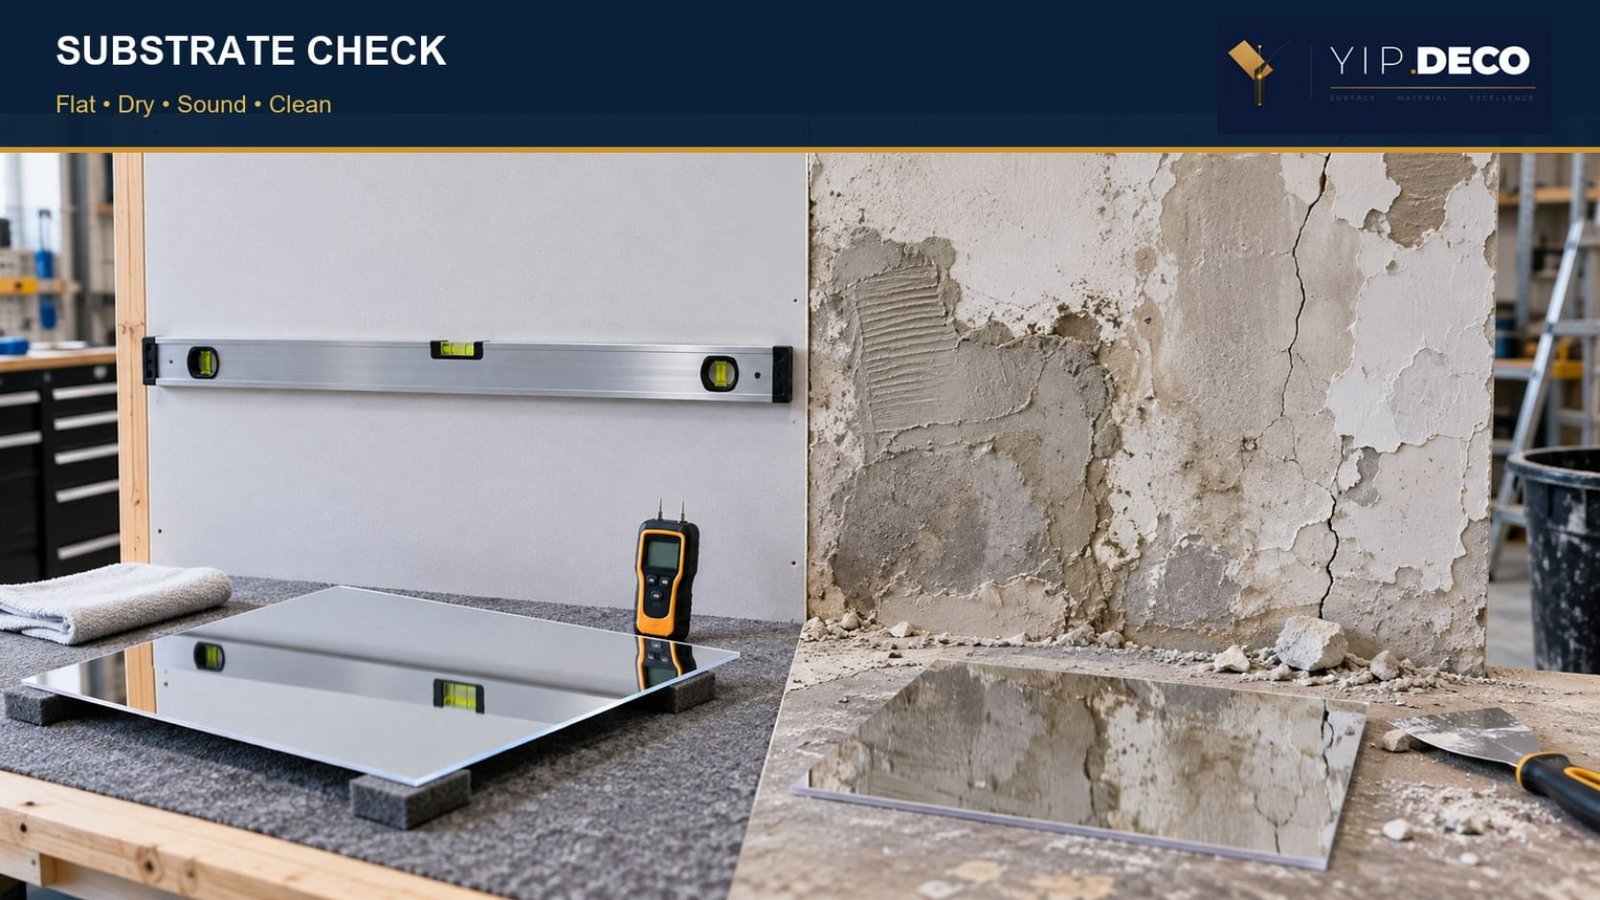
The reflective finish magnifies wall defects. Check flatness, surface strength and moisture before bonding; a dusty, cracked or uneven base should be repaired or covered with an approved rigid backing first.
Substrate inspection checklist
- Check the wall with a straightedge over the panel area.
- Mark high and low spots that could affect reflection.
- Confirm that dust, release agents, oil and weak paint have been removed.
- Test existing coatings instead of bonding to an unknown layer.
- Verify the substrate moisture condition with an appropriate meter or approved test method.
- Confirm that board joints and fastener heads will not telegraph through the finished face.
- Allow primers, fillers and leveling compounds to cure fully.
- Install one representative mock-up before releasing the full wall.
If the wall cannot meet the required flatness, a prepared rigid backing or a factory-finished panel construction may produce a more reliable result than bonding a thin sheet directly to the site wall.
Which Adhesives Are Compatible With Acrylic Mirror Backing?
Adhesive chemistry is the most common source of avoidable failures. Solvent-containing products can attack an acrylic sheet or its reflective backing. An adhesive can also be compatible with the mirror but unsuitable for the wall, primer or backing board.
Use only a product that the mirror-panel supplier and adhesive manufacturer accept for the complete material combination. “Neutral-cure silicone,” “mirror adhesive” or “MS polymer” is a starting category, not automatic approval. Formulations differ, so compatibility must be confirmed for the exact product.
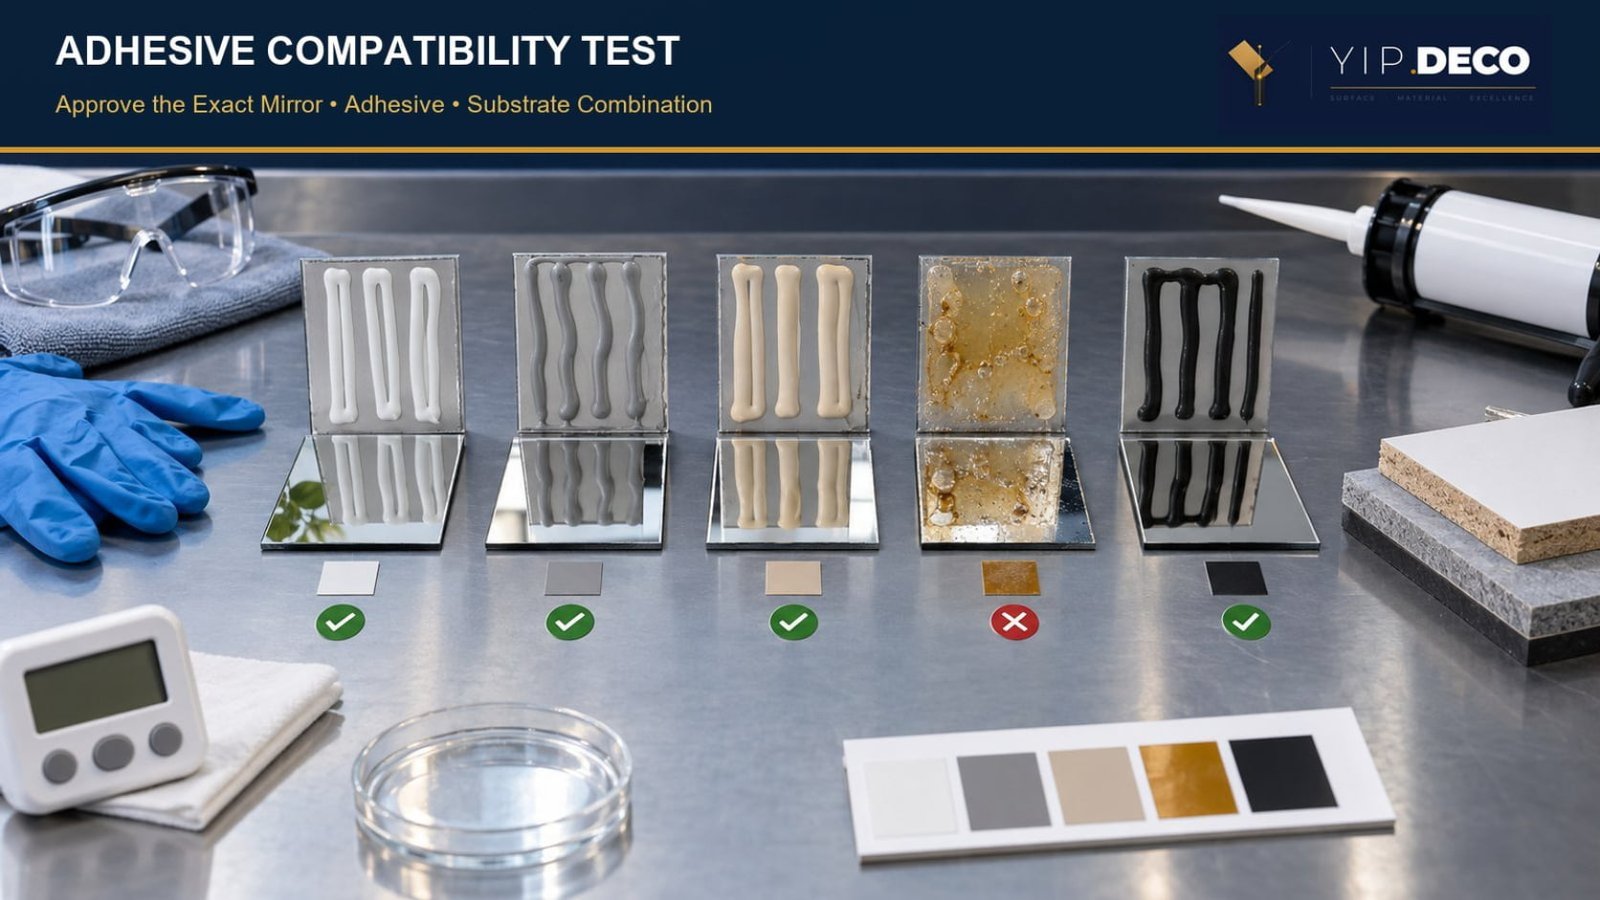
Test the exact mirror backing, adhesive, primer and substrate combination before installation. A product that bonds well can still be unsuitable if it stains, bubbles or attacks the reflective coating.
| Do | Do not |
|---|---|
| Request written compatibility for the mirror backing and substrate | Assume a general construction adhesive is safe because it bonds other wall panels |
| Test the full combination on an expendable sample | Test only the face material while ignoring the reflective coating and backing |
| Follow the adhesive maker's bead pattern, open time and cure requirements | Spread an unapproved solvent adhesive across the back |
| Allow ventilation and curing as specified | Seal every edge immediately if the adhesive requires moisture or airflow to cure |
| Keep records of product name, batch and test result | Substitute a site product after the mock-up without review |
The Plaskolite FABBACK fabrication guide recommends testing adhesive on expendable material before installation and observing the sample for compatibility. The ACRYLITE Reflections technical information likewise emphasizes a rigid, clean and dry mounting surface and controlled installation.
Run an installation sample before full production
The test should reproduce the actual project combination:
- mirror grade and thickness;
- backing or finished-panel construction;
- primer and substrate;
- adhesive product and application pattern;
- curing temperature and humidity;
- joint and profile detail;
- cleaning method.
Inspect for coating damage, discoloration, bubbling, local waviness, weak adhesion and edge lifting. Keep the sample through the minimum observation period stated by the material and adhesive suppliers.
How to Plan Natural Seams and Expansion Allowance
A natural seam is part of the engineering and the visual design. Acrylic moves more with temperature change than glass, while backing boards, aluminum profiles and building substrates move at different rates. A tightly trapped panel has nowhere to relieve that movement.
Do not copy a universal gap number from a generic article. The required allowance depends on panel length, temperature range, material grade, backing, profile design and fixing method. Calculate and approve it from the technical data sheet and project conditions.
For modular walls, organize the elevation around repeatable panel sizes and consistent joints. Confirm:
- finished panel dimensions and tolerances;
- expected installation and service temperatures;
- perimeter clearance;
- joint-profile engagement depth;
- whether adhesive remains flexible after cure;
- where movement can be absorbed;
- how corners and changes of material are finished;
- whether a damaged module can be removed later.
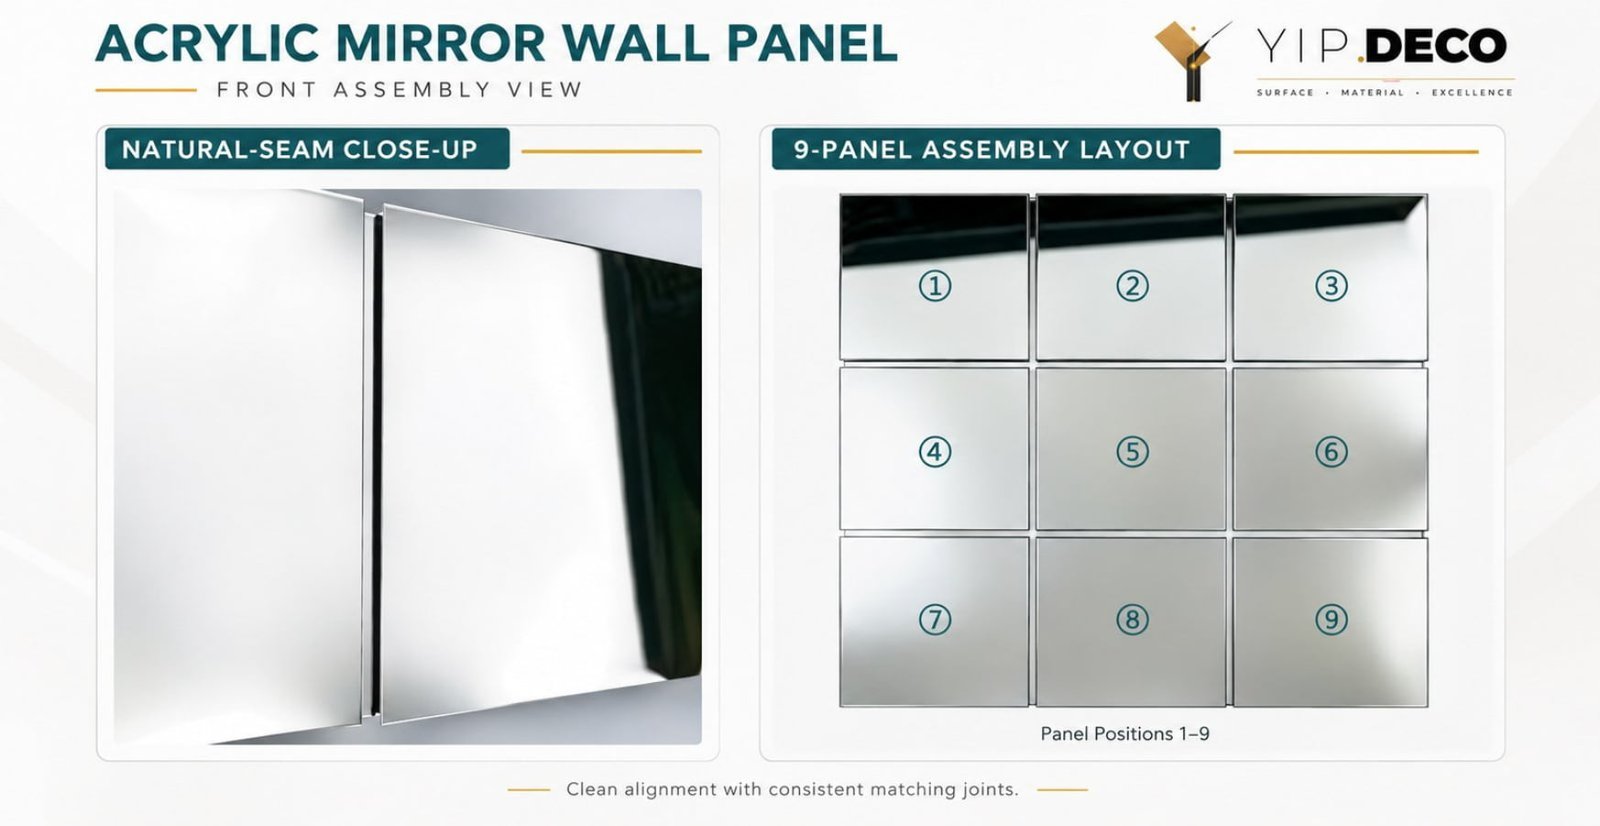
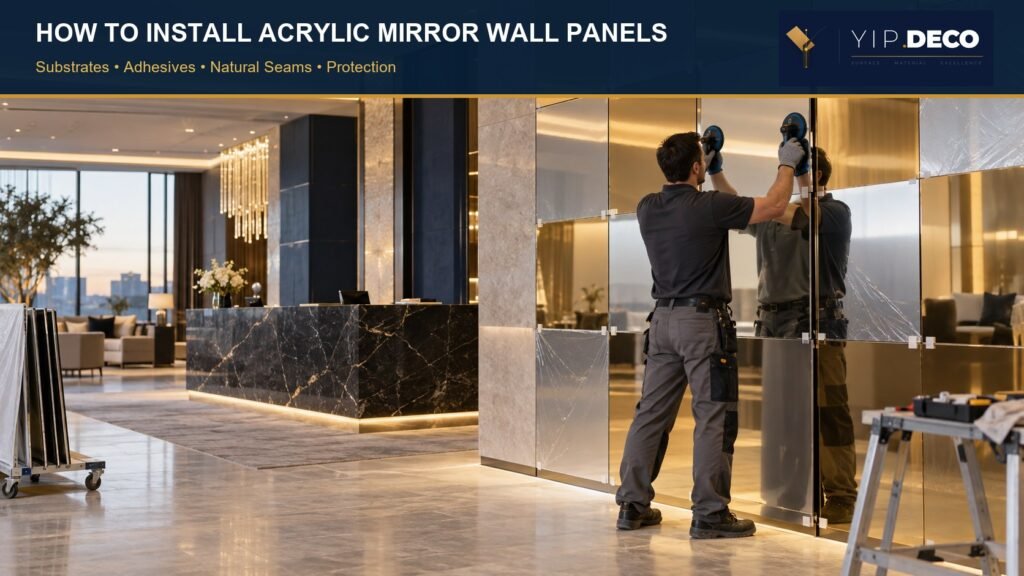
A nine-panel layout turns unavoidable joints into a controlled design rhythm. Numbering the modules and approving the seam width before installation helps the team keep panel order, alignment and reflection consistent across the wall.
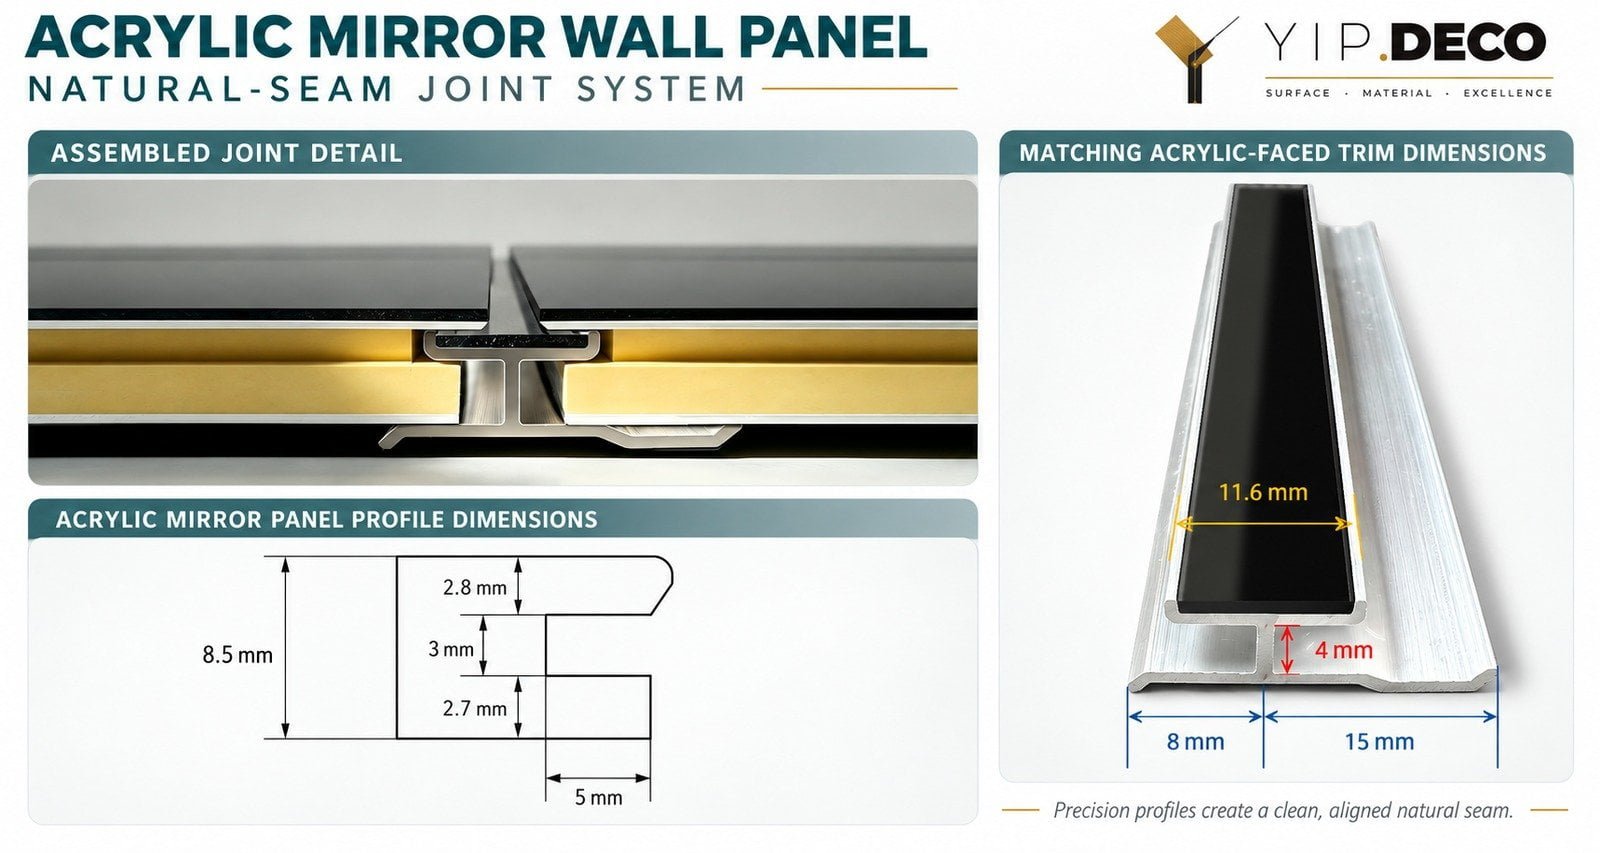
A matching acrylic-faced profile aligns adjoining panels and creates a clean natural seam. The profile dimensions, finished panel thickness and site tolerance must be checked together before cutting or bulk production.
A Practical Installation Sequence for Trade Teams
The exact method varies by product, but the following sequence keeps the critical decisions in the right order.
1. Review drawings and panel schedule
Confirm module numbers, orientation, finished dimensions, cut-outs, visible edges, lighting, corners and interface with adjacent wall materials. Identify the datum line and the most visible sight lines.
2. Condition and inspect the material
Store panels flat and protected in the installation environment as directed by the supplier. Check the face, edges, backing and protective film before cutting. Record transit damage before work begins.
3. Prepare and test the substrate
Complete leveling, cleaning, priming and moisture checks. Dry-fit representative panels and profiles. A reflection check at the intended viewing distance can reveal wall irregularities that a normal finish might hide.
4. Make a first-bay mock-up
Use the approved adhesive, bead pattern, profile and seam detail. Include a corner or material transition if possible. Let the assembly cure before evaluating bond, reflection and alignment.
5. Cut and drill with suitable plastic-processing methods
Support the panel fully, use sharp tooling and prevent vibration. Keep the face protected. When mechanical fixings are part of the approved design, follow the product guide for hole clearance, washers and tightening; concentrated pressure can create visible dimples.
6. Apply the approved fixing system
Follow the documented application pattern rather than improvising full-spread coverage or random beads. Position the panel without sliding abrasive particles across the face. Use temporary support or spacers that do not mark the surface.
7. Maintain the joint layout
Use consistent spacers or the specified connection profile. Check each row against the datum before the adhesive sets. Small alignment errors accumulate across a large modular wall.
8. Finish edges, trims and adjacent work
Protect the mirror while installing skirting, LED profiles, corner trims, ceilings and adjoining panels. Do not allow metal tools or cut trim edges to drag across the face.
9. Remove film only at final inspection
Peel the protective film after dusty work, trimming and cleaning of adjacent trades are complete. Remove it carefully and inspect under the project lighting. Use only a cleaner and cloth approved for the exact mirror grade.
The Protective Film Is an Installation Tool
Installers sometimes remove the film early because the wall looks unfinished or because they want to judge the reflection. That exposes the surface during the stage with the highest risk of tool contact, dust and adjacent construction.
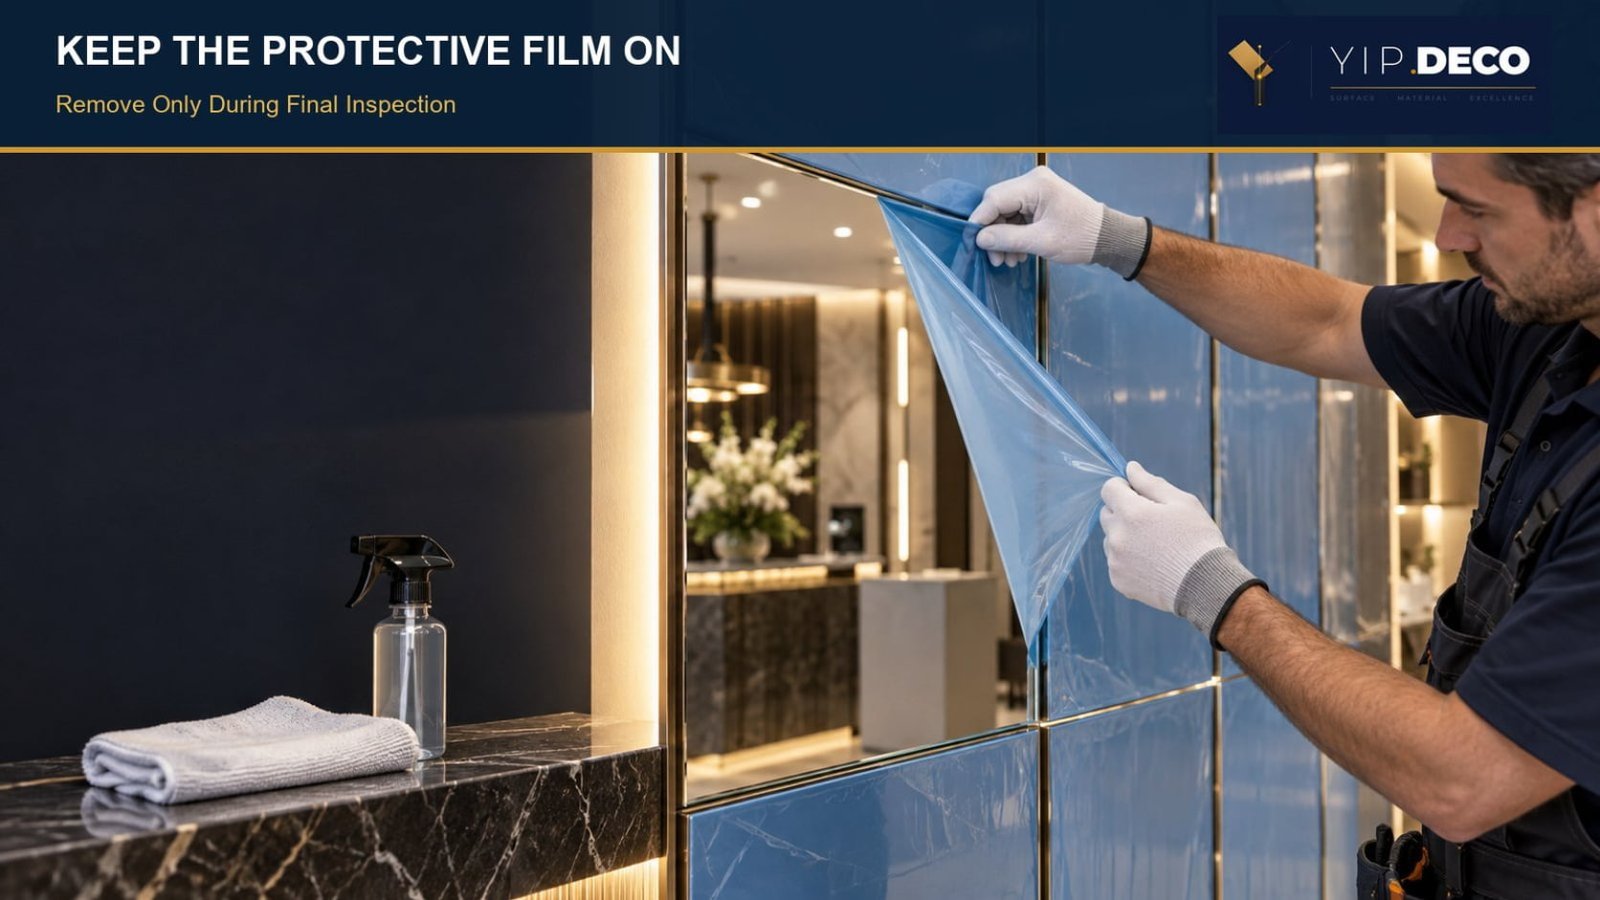
Leave the protective film on during handling, cutting, bonding and trim work. Remove it only when adjacent work is complete and the team is ready for final surface inspection and approved cleaning.
Keep the film intact through handling, cutting and most installation work. If a small area must be opened to inspect an edge or joint, fold back only what is necessary and protect it again. Do not write directly on the face or use aggressive tape that the supplier has not approved.
At handover, provide the cleaning team with written care instructions. Acrylic mirror is more scratch-sensitive than glass, so dry wiping, abrasive pads and unknown solvent cleaners should be excluded.
Video: Acrylic Mirror Wall Panel Installation
<!-- YIPDECO_VIDEO_SLOT: Add the approved acrylic mirror installation video link/embed here. Suggested sequence: substrate check, adhesive compatibility sample, numbered 9-panel dry layout, natural-seam profile installation, protective-film removal and final reflection inspection. -->
Video placeholder: a future YipDeco installation demonstration will show substrate inspection, the adhesive test, panel numbering, natural-seam alignment and final film removal.
Final Handover Checklist
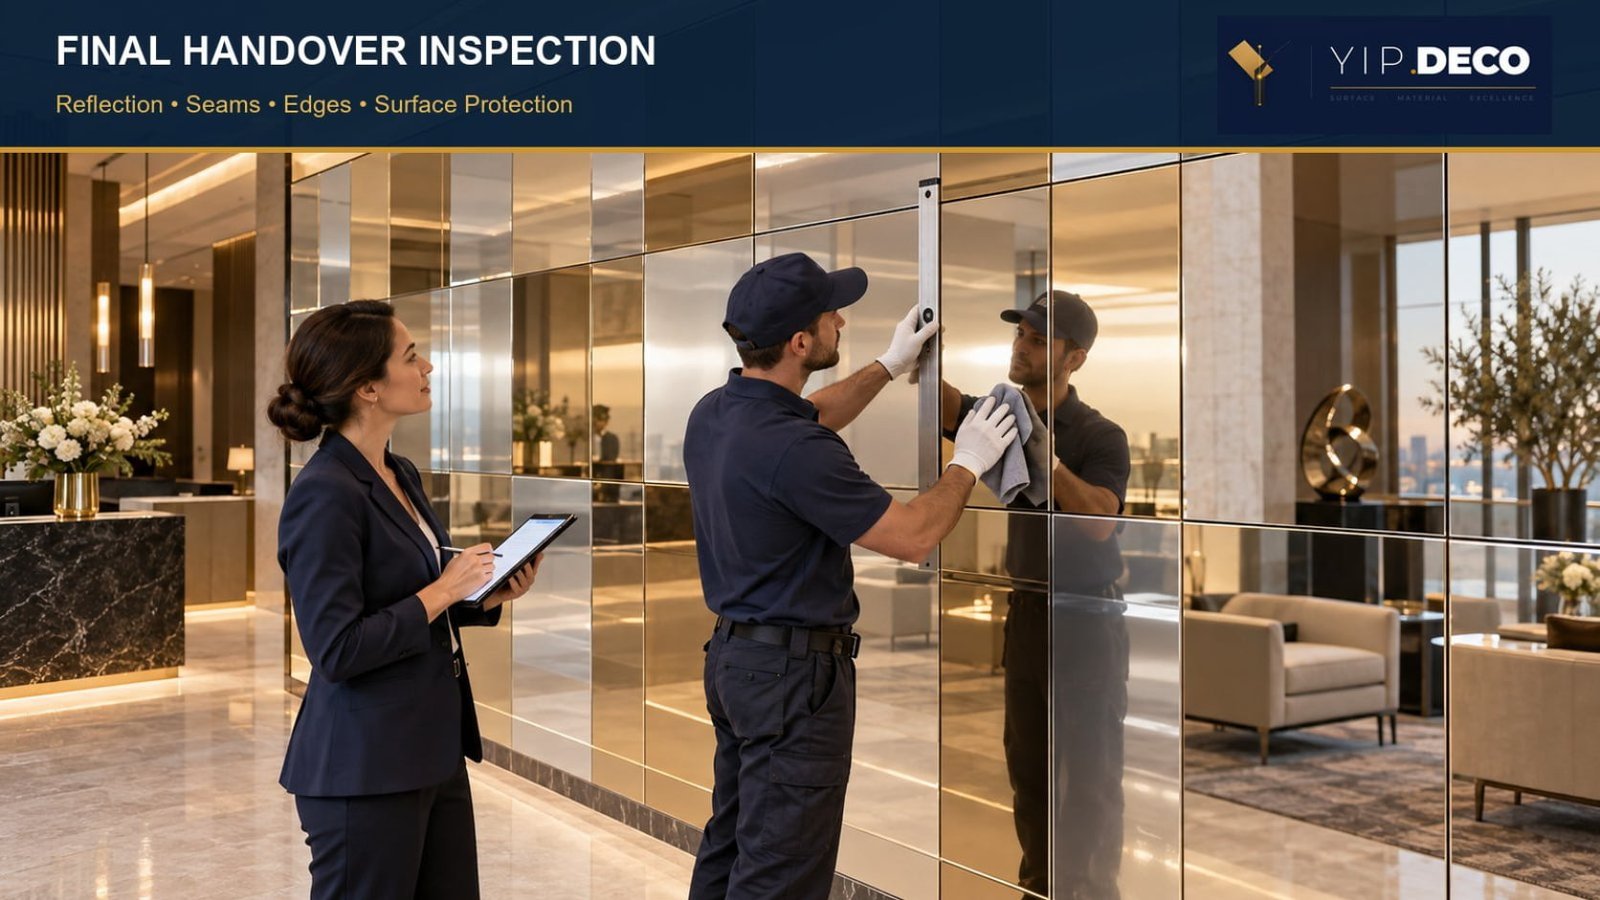
Final inspection should check reflection, seam alignment, edge engagement and surface condition from the agreed viewing positions under project lighting.
Before the installation team leaves, check:
- overall reflection from the agreed viewing positions;
- panel sequence, tint direction and joint rhythm;
- perimeter and movement details against the approved drawing;
- edge and corner profile engagement;
- bubbles, backing damage, lifted edges or local dimples;
- scratches under normal project lighting;
- adhesive cure and removal of temporary supports;
- cleaning method and maintenance instructions;
- spare panels, profiles and batch references;
- photographs of concealed fixing details and the approved mock-up.
For overhead or safety-critical locations, an adhesive-only method should not be assumed. Use the mechanical retention or edge-engaging system designed for that application, and obtain approval from the responsible project professional.
What to Send YipDeco Before Installation
For useful technical feedback, send:
- project location and application;
- wall elevation and panel schedule;
- mirror color and finished-panel construction;
- panel size and quantity;
- substrate description and condition;
- proposed adhesive data sheet;
- site temperature and humidity range;
- joint, corner and perimeter details;
- vertical or overhead orientation;
- required sample and mock-up size.
YipDeco can review the proposed construction from the product-supply side and help identify questions that should be closed with the adhesive manufacturer, installer and project engineer.
Explore the Acrylic Mirror Panel range, coordinate adjoining details through Wall Connection Accessories, or organize a physical approval set through Sample Kits.
Conclusion
The safest way to understand how to install acrylic mirror wall panels is to treat the wall as one tested assembly. Confirm the finished panel construction, qualify the substrate, verify the adhesive on a real sample, design natural seams from the technical data and keep the protective film in place until final handover.
These controls protect both appearance and accountability. They also give project buyers a clear approval trail before bulk installation begins.
Frequently Asked Questions
Can acrylic mirror panels be installed directly on a painted wall?
Only after the paint and underlying wall are proven sound, flat, dry and compatible with the selected adhesive. A bond to weak or chalking paint is only as strong as the paint layer. A prepared rigid backing may be more reliable for large reflective areas.
What adhesive should be used for acrylic mirror panels?
Use a mirror-compatible product approved for the exact reflective backing and substrate. Neutral-cure silicone, mirror-grade products and MS polymers may be candidates, but the specific formulation must be confirmed and sample-tested. Avoid unverified solvent-based construction adhesives.
How wide should the expansion gap be?
There is no safe universal number. Calculate the allowance from panel dimensions, PMMA material data, service temperature range, backing construction and profile design. Follow the exact product technical data sheet and project engineer's requirements.
When should the protective film be removed?
Keep it in place through cutting, fitting, bonding and nearby trim work. Remove it during final inspection after dusty and abrasive work is complete, using the supplier's instructions.
Can acrylic mirror panels be used on ceilings?
Only with a system designed for overhead use. Confirm mechanical retention or an edge-engaging frame, substrate capacity and project approval. Do not rely on an unverified adhesive-only method.